
To boost creativity in 10-minute sessions, I recommend using a large red LED display with high contrast and adjustable brightness, so it’s visible in various environments. Opt for models with reliable power sources and long-lasting batteries to keep the session uninterrupted. Durability is key, so choose sturdy materials that resist wear and tear. If you continue exploring, you’ll discover how to pick the perfect panel for your specific needs to maximize your creative flow.
Key Takeaways
- Choose high-brightness LED panels with adjustable settings for optimal visibility in various lighting environments.
- Select durable, environmentally resistant panels with customizable features to maintain focus and reduce eye strain during sessions.
- Use wall-mounted or free-standing panels with easy controls and remote operation for seamless session management.
- Ensure panels have clear, large characters (around 1.8 inches) for quick readability from at least 50 feet.
- Opt for cost-effective, energy-efficient panels that support quick setup and long-lasting use within a 10-minute timeframe.
Large Red LED Digital Wall Countdown Clock with 1.8″ High Characters for Indoor
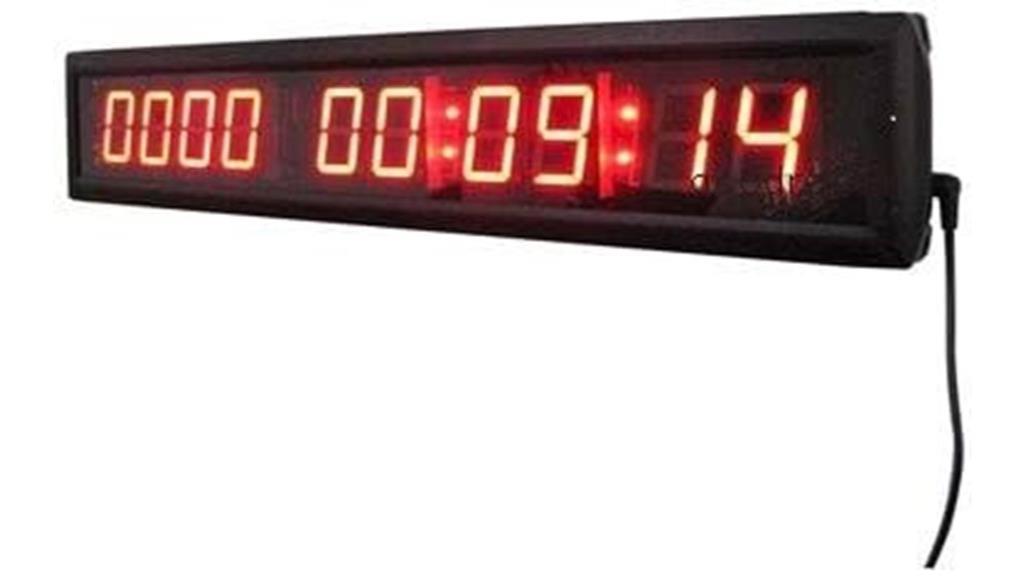
If you’re looking for a reliable countdown clock for indoor use, the Large Red LED Digital Wall Countdown Clock is an excellent choice. Its 1.8-inch high digits ensure clear visibility from across the room, making it perfect for long-term events or deadlines. With a sturdy aluminum case and easy mounting brackets, setting it up is straightforward. It supports countdown or count-up modes for up to 10,000 days, giving you flexibility. Plus, remote control operation within 5 meters makes adjustments simple. Low power consumption and precise timing features make this clock both efficient and dependable for any indoor setting.
Best For: individuals or organizations needing a clear, reliable indoor countdown clock for long-term events, project deadlines, or building site timers with remote operation capability.
Pros:
- Large 1.8-inch high digits for excellent visibility from a distance
- Supports both countdown and count-up modes up to 10,000 days for versatile use
- Easy to mount with included brackets and operate remotely within 5 meters
Cons:
- Customer reviews average only 2.8 out of 5 stars, indicating some user dissatisfaction
- Designed solely for indoor use, limiting outdoor applications
- Slightly heavier and larger, which may require secure mounting and space considerations
Led Edge-Lit Exit Sign, UL Listed, 2 Pack

The Led Edge-Lit Exit Sign, UL Listed, 2 Pack is an excellent choice for facilities that prioritize safety and compliance, thanks to its UL 924 certification and durable flame-retardant housing. Its sleek brushed aluminum design and high-grade acrylic face guarantee durability and visibility in damp locations. With universal mounting options—ceiling, wall, or side—and included hardware, installation is flexible and straightforward. The built-in rechargeable battery provides over 90 minutes of emergency illumination, making it reliable during outages. Its ultra-bright LEDs are visible up to 100 feet, ensuring safety in any indoor environment like hospitals, malls, or offices.
Best For: facilities such as hospitals, malls, offices, and warehouses that require reliable, UL-listed emergency exit signage with versatile mounting options and long-lasting illumination.
Pros:
- UL 924 certification ensures compliance and safety standards.
- Durable flame-retardant housing with high-grade acrylic face for visibility in damp locations.
- Flexible installation with universal mounting options and included hardware.
Cons:
- Higher initial cost compared to basic exit signs.
- Battery recharge time of up to 24 hours may require planning for continuous use.
- Limited to indoor environments; not suitable for outdoor use.
Factors to Consider When Choosing a 10‑Minute Session Red Panel

When selecting a 10-minute red panel, I consider factors like visibility and brightness to guarantee it’s easily seen in emergencies. I also look at power options and battery life to keep it reliable during outages, plus how it mounts and fits in the space. Finally, durability, size, and character height matter to make sure it performs well and is easy to read when it counts.
Visibility and Brightness
Are you confident your red panel will be visible in bright, well-lit environments? Ensuring high brightness is key; look for panels with high-brightness LED displays that can be seen clearly from at least 50 feet away. Adjustable brightness settings allow you to tailor visibility to different lighting conditions, making sure your message always stands out. Ultra-bright LED technology provides consistent illumination without fading over time, which is essential for reliability. Check that the display characters are large enough—about 1.8 inches or more—to be easily read from a distance. Additionally, an anti-glare or matte surface coating reduces reflections and improves clarity from various angles. These features ensure your red panel remains visible and impactful, no matter the environment.
Power and Battery Life
Ensuring reliable power is vital for your red panel’s performance during a 10-minute session. I recommend using a stable 5VDC power source to keep the device running smoothly without interruptions. Check if your panel has a backup battery, like a 4.8V Nickel Cadmium, for emergency power if the main supply fails. It’s important to confirm that the power consumption is low enough to avoid draining energy quickly, ensuring continuous operation throughout the session. Additionally, verify that the power supply and battery can sustain the device for the entire 10 minutes. Ease of recharging or replacing the battery is also essential, especially if you plan to use the panel repeatedly. These considerations help maintain consistent performance and minimize disruptions.
Mounting and Placement
Choosing the right mounting and placement for your red panel is vital to its effectiveness during a 10-minute session. First, verify it’s compatible with your chosen surface—wall, ceiling, or free-standing—to guarantee stability. Check the mounting hardware included or needed, like brackets or adhesive, to make setup quick and secure. It’s also important to confirm the panel’s size and dimensions so it fits the space without blocking visibility or interfering with other equipment. Proper placement height is key; position the panel where it’s easily visible and readable without strain. Finally, consider if the mounting method allows for easy removal or adjustments, helping you adapt to changing needs or perform maintenance effortlessly. Proper mounting and placement maximize your session’s impact.
Durability and Material
The durability and material of your red panel directly impact how well it holds up during frequent use and in different environments. I recommend choosing panels made from high-impact materials like polycarbonate or reinforced acrylic, as they resist cracking and warping. It’s also important that the material can withstand environmental factors such as humidity, heat, and UV exposure to maintain its integrity over time. Scratch-resistant coatings are a smart choice, especially in busy settings, to keep the panel clear and professional-looking. Additionally, consider the thickness and density of the material—thicker panels tend to be more resilient. Finally, verify the material is compatible with cleaning agents and disinfectants you plan to use, preventing degradation and making maintenance easier.
Size and Character Height
Selecting the right size and character height for your red panel is essential for maximizing visibility and readability during a 10-minute session. Larger characters, around 1.8 inches, improve visibility from greater distances, ideal for spacious indoor settings. The display size should match the viewing area to guarantee easy reading without overwhelming the space. Character height influences how well the clock can be seen in environments with bright lighting or across large rooms. It’s also important to balance size with power consumption to maintain efficiency during extended use. Additionally, ensure the display complies with safety standards for visibility and accessibility. By carefully choosing size and character height, you’ll create a red panel that’s both effective and user-friendly, enhancing your session’s overall impact.
Mode and Customization
When evaluating a red panel for your 10-minute sessions, it’s important to look at its modes and customization features. I focus on whether it supports multiple timing modes like countdown, count-up, or interval, to suit different tasks. User customization of the time display—hours, minutes, seconds—is essential for flexibility. Adjustable start, stop, and reset controls help me manage sessions precisely. Wireless operation or remote control within about five meters makes adjustments easier without interrupting my flow. Additionally, customizable display options like brightness levels and alert features allow me to tailor visibility and notifications, ensuring I stay focused and aware without distraction. These features help me personalize the panel, making it more effective for varied creative activities.
Cost and Value
Considering the features that make a red panel effective, evaluating its cost and overall value is equally important. The price of a 10-minute session red panel varies based on features, brand, and durability, which directly influences its worth. Investing in a higher-priced panel with advanced features like increased brightness or customization can pay off with better long-term performance and reliability. Cheaper options may save money upfront but often lack durability or visibility, reducing their effectiveness over time. It’s essential to weigh the initial cost against ongoing expenses like maintenance or replacements. Additional features, such as ease of installation and adjustable settings, can also boost value by enhancing usability without adding significant expense. Ultimately, balancing cost with features ensures you get the best return on your investment.
Frequently Asked Questions
How Can I Customize Red Panel Sessions for Different Creative Needs?
You can customize Red Panel sessions by tailoring questions and topics to your specific creative goals. I recommend identifying your current challenges or areas you’d like to explore, then selecting prompts that inspire fresh ideas. Incorporate different media or invite diverse participants to bring new perspectives. Adjust the session length or format based on your needs, and always reflect afterward to refine future sessions for maximum creativity.
What Safety Measures Should I Observe During Quick Red Panel Sessions?
Think of safety as the anchor in a stormy sea. During quick red panel sessions, I make sure to set clear boundaries, avoid sensitive topics, and respect everyone’s comfort levels. I keep the environment positive and confidential, encouraging open sharing without pressure. Monitoring the group’s mood helps me spot discomfort early, ensuring the session stays productive and safe. Safety first keeps the creative flow sailing smoothly!
Are There Specific Times of Day When Red Panel Sessions Are Most Effective?
I find that red panel sessions are most effective in the mid-morning or early afternoon. During these times, my energy levels are high, and I’m more focused, making it easier to spark creativity. I avoid early mornings when I’m still waking up and late afternoons when fatigue sets in. Scheduling sessions around these peak times helps me stay engaged and get the most out of each quick, stimulating session.
How Do Red Panel Colors Influence Different Types of Creative Thinking?
Red panel colors energize me and spark bold, innovative ideas. They boost my confidence and encourage risk-taking, perfect for brainstorming sessions. The vibrant hue stimulates my passion, helping me think outside the box and challenge norms. I find red particularly effective when I need a burst of motivation or to push past creative blocks. It’s a powerful color that transforms my mindset and fuels dynamic, daring creativity.
Can Red Panel Sessions Be Combined With Other Creativity Techniques?
Absolutely, red panel sessions can be a spark plug in your creativity toolkit. I often blend them with brainstorming or mind-mapping to ignite fresh ideas, like adding kindling to a fire. Combining these techniques transforms a simple session into a whirlwind of innovation, where energy and focus collide. This synergy fuels my creative flow, making each minute feel like a powerful leap toward breakthrough ideas.
Conclusion
Ready to revive your creativity in just 10 minutes? By balancing brightness, battery, and build, you’ll boost your brainpower with brilliant red panels. Remember, selecting the right size and style sparks success, saving you stress and spending. So, seize the session, choose smartly, and supercharge your skills—speedily and simply. Let these quick tips turn your red panel sessions into powerful productivity boosters, propelling you toward your creative goals with ease and enthusiasm!